Friday, January 24, 2020

How to read or edit a large text file in Windows 10?

One of my colleagues needed to open a large XML file (nearly a Gigabyte in size) to review the data and make any corrections to it. She tried Notepad++ as well as Microsoft XML Notepad 2007. It took minutes to load the file. She could barely scroll through the page.

I searched for a free and opensource tool that would do the job. I came across GNU Emacs. It is a powerful editor for the GNU operating system. GNU Emacs for Windows is also available for download, and it works like a charm.


Download Instruction is available at: https://www.gnu.org/software/emacs/download.html

To get a copy of GNU Emacs for Windows, you can visit http://ftp.gnu.org/gnu/emacs/windows/  and download the latest version for your platform. 

For example, on my 64-bit Windows 10 system with an Intel processor, I downloaded emacs-26.3-x86_64.zip. I unzipped the folder at my desired location (C:\Program Files\Emacs) and browsed to the bin folder to launch emacs.exe. I also created a desktop shortcut to emacs.exe.

This editor opened that large XML file without any hesitation. It was easy to work on. I helped my colleague setup this editor on her workstation. She got very excited as she was able to work on the file effortlessly. I am sure you will find this editor exciting too when you run into the same issue my colleague ran into. 


How did I prepare for my CISSP exam?

I cleared CISSP exam in the first attempt last week. I have been working in the technology area for 10 years now in several roles (from the Engineer level position to the Director level position). I followed the following resources in the sequential order.
  • Cybrary CISSP Free Online course by Kelly Handerhan : This gave me a quick overview of CISSP course. [Spent roughly 30 hours here.]
  • CISSP by Shon Harris : Read first four domains. I got in-depth knowledge of those four domains. [Spent about 20 hours here.]
  • Simple CISSP by Phil Martin (Audio Book): Great to listen during lunch, workouts and drive-time. [Spent about 30 hours here. Listened to some sections multiple times.]
  • Spent some time going over r/cissp comments. Saw lots of advice that CISSP exam is more about management-based questions and less about knowledge-based questions. I decided to focus more on 'WHY' factors of all the security domains, rather than trying to memorize every technical details and numbers.
  • I set a 60 days goal to appear for the exam and registered for the test.
  • During first 50 days, I read CISSP Official 7th edition book cover to cover, word by word, highlighting the areas that I felt crucial. Also, completed CISSP Official Practice tests during those days. [Spent roughly 2 hours each day; 1 hour during the work lunch and 1 hour at home]
  • Next 7 days, I read Eleventh Hour CISSP study guide by Eric Conrad.
  • During last three days, I reviewed all of the highlights I made on CISSP Official 7th Edition book and summaries/quizzes at the end of each chapter.
  • Took a good enough sleep and rested before the exam.
During the testing, I planned to finish 40 question during the first hour, 50 questions during the second hour and 60 questions during the third hour. Since CISSP exam is the adaptive test and can't go back to correct the answers, I wanted to make sure I carefully read and answered the top 100 questions. I kept track of the number of questions I answered approx every 30 minutes and made sure I was on track.
Majority of the questions were scenario based questions and I had to think from the management perspective to answer the questions. It was a terrifying experience to go through those questions. I had to remind myself several times not to worry but focus on the questions and what would I do as a CIO or CISO while answering the questions. My test completed at 102 questions. And, sure enough, I passed the test.
I hope you find this information useful for your own CISSP journey. Best of Luck!

Friday, January 3, 2020

Frameworks for the Successful Large-Scale Change

In my career, I had opportunities to lead the several large-scale change projects that would impact almost all the employees and the customers of the organization. Switching out the legacy communication system, Windows 10 roll-out, Technology Refresh project, Business Processes Automation, and Paperless initiative are to name a few. When implementing the change, there is a mix of excitement and resistance. The people are on an emotional roller coaster ride out there. In this article, I would like to share what we did to successfully implement those large scale changes and also present a few frameworks that can be used as the guideline when implementing the change.

In my experience, with the stakeholders’ buy-in, the top management support and the proper planning, we got closer to the desired state a lot easier in the transformation projects. We communicated the sense of urgency on why the change is necessary, built the guiding committee, got the right vision and strategy for the change effort, made people feel empowered, created several smaller wins. We let the momentum build and continued making the several waves of changes until the desired state reached and continued the effort until the new state became the new status quo. This process is not always easy but it hasn’t failed for us yet either.


Image Source: https://www.maxpixel.net/Rowing-Ship-Lake-Boot-Leisure-Water-Boat-Trip-1015405

Each enterprise is unique in its own culture. Daily practices are embedded in its culture, and thus culture is incredibly resilient. Cultural transformation aims at making a fundamental change in the business practices to adapt to a new ever-changing competitive market. Cultural transformation via logic alone is not possible. People don’t welcome a change unless they see the rewards, the clear message/vision for the transition, and feel empowered. Stakeholders buy-in and support of senior management is crucial for the successful transformation.

There are some useful frameworks for cultural transformation which can be used as the guidelines for the successful transformation.


Kurt Lewin’s Three-Stage Change Model


This model provides a high-level fundamental approach to implement a change effort and make sure it sticks. Here are the three stages of Kurt Lewin’s change model:

Stage 1. Unfreeze the existing culture

Ice cube has to be melted before it can be transformed into a different shape. Similarly, for the cultural transformation, the people have to be ‘unfrozen’ as the natural tendency of many people is to resist change and stick to the old ways. Unfreezing is the process of spreading awareness and getting buy-in on why the status quo has to go, and things have to be done differently. Storytelling can be a great tool to achieve this goal.

Stage 2. Implement the change

In this stage, the change becomes a reality. It has to be carefully planned and executed. Most people struggle with this new reality as they have to learn new ways of doing things. Professional development, communication, support and time are critical for people to become familiar with the change.

Stage 3. Refreeze the new culture before it rollbacks to the old way

This is when the effort is made so that new state continues despite the pull of the old ways ensuring the people do not revert to their old ways of thinking or doing things.


Kubler-Ross’ Change Curve based on the Five Stage of Grief model


This model provides the emotional stages (Denial, Anger, Bargain, Depression & Acceptance) the people experience when faced with changes or loss. It helps to understand the stages of personal and organizational transitions. Some people will inadvertently be affected negatively by the change, particularly those who benefit from the status quo. Some people will feel threatened or insecure by the change. Some people may not believe in the change. The emotional component is crucial when considering the cultural transformation. An organization should support its employees in the process of making changes. If people feel that you are making it hard for them, they will push back and likely do something you don’t want.


John Kotter’s The Eight Steps Change Model


This model provides the eight critical steps for increasing the chances of successful change programs.

Step 1. Create urgency on why the change is crucial

Step 2. Form a powerful coalition to guide the transformation

Step 3. Develop the right vision and strategy for the change

Step 4. Communicate the vision to get the buy-in

Step 5. Empower people to act on the vision

Step 6. Plan for and create short-term wins

Step 7. Build on the change by creating waves of changes

Step 8. Anchor the changes in the culture to make sure the new state sticks.

Be resilient when embarking on the cultural transformation process as the ride is going to be full of surprises and messy. Trusted relationships among the stakeholders with a clear vision and responsibilities are crucial. There will be several ups and down, and the change process may fail. If it fails, it should be taken as the shared responsibility, learn from the failure and start again until the goal is achieved. There is a popular narrative that 70% transformation programs fail. However, adopting the framework as the guidance can help get closer to the desired state.


References:
Kurt Lewin’s Three Stage Model

Kubler-Ross’ Change Curve

John Kotter’s The Eight Steps Change Model

Sunday, October 21, 2018

Setup Microsoft SQL Developer environment in a few minutes using Docker

Let's say you have Windows 10 PC and would like to setup Microsoft SQL for the development and testing.

#Download the installer and install Docker for Windows
https://docs.docker.com/docker-for-windows/install/
(Caution: This is not for the production environment. It is only for the development and testing.)

#Switch Docker to Windows container after the install
#It is easy switch. Find the Docker tray icon in the task bar> right click > Switch to Windows Container

#To pull docker image from docker hub
#Use Windows PowerShell to run the Docker commands
docker pull microsoft/mssql-server-windows-developer

#For details: https://hub.docker.com/r/microsoft/mssql-server-windows-developer/

#To run the container using the pulled image
docker run -d -p 1433:1433 -e sa_password=Password1! -e ACCEPT_EULA=Y microsoft/mssql-server-windows-developer

#Above Docker command maps container port 1433 to host port 1433. Thus, host IP address or gateway.docker.internal can be used in SSMS to gain access to the database. Credentials: Local Authentication, sa username and Password1! for the password.

#Download and install SSMS from https://msdn.microsoft.com/en-us/library/mt238290.aspx

#More on Docker Networking features at https://docs.docker.com/docker-for-windows/networking/

#To check the currently running containers
docker ps

#To list the containers
docker container ls -all

#To view an IP of a docker container
docker inspect –format='{{range .NetworkSettings.Networks}}{{.IPAddress}}{{end}}’ 

#To stop the container
docker container stop 

#To start the container
docker container start

#To remove the cotainer
docker rm

#To list the docker images
docker image ls

#To download and restore sample database from Microsoft
Visit https://docs.microsoft.com/en-us/sql/samples/adventureworks-install-configure?view=sql-server-ver15
Download one of the backup files you are interested in. Say, you downloaded Advendtureworks.bak file to c:\Downloads folder.
Copy the backup file to the MS SQL Server container. Top copy the file from the local host to the container, you have to STOP the container first.
docker container stop   
docker cp c:\Downloads\Adventureworks.bak   :c:\Users\Public\

Start the container. Now, follow the restore instruction provided in the earlier URL.


#For more docker commands, refer to
https://docs.docker.com/docker-for-windows/

Monday, November 6, 2017

Understanding CISSP domains

Disclaimer: I am writing this blog as a personal notebook for CISSP exam preparation. It shouldn't be used as otherwise.

CISSP Common Body of Knowledge covers 8 domains.

WHY?
1. Security & Risk Management

WHAT?
2. Security of Asset
3. Security of Network and Communication
4. Security of Software and Development

HOW?
5.Assessment and Testing
6. Security Engineering
7. Security Operations
8. Identity and Auth Management


1. Security & Risk Management

WHY?

  • It is all about CIA (Confidentiality, Integrity and Availability), also referred as AIC

HOW?  

  • Administrative/Management(soft) Controls,
  • Technical (logical) Controls and 
  • Physical/Operational Controls

Control Types:

  • Preventive
  • Detective
  • Corrective
  • Deterrant
  • Recovery

Understand these terminologies is crucial:

  • Asset: What we are trying to protect
  • Vulnerability: Weakness or gap in our protection efforts
  • Threats: Anything that can exploit a vulnerability
  • Risk: The potential loss of an asset as a result of a threat exploiting a vulnerability. It is the intersection of above three (Asset, Vulnerability and Threat)
  • Corrective Action : Assessing threats and identifying vulnerabilities is critical to understanding the risk to assets and take appropriate corrective action.

Security Frameworks:
1. ISO/IEC 27000 Series
  • Defines ISMS (Information Security Management System)
  • Specifies the components/controls that need to be in place to have a complete security program
  • It is like a parts list.
2. Enterprise/Security Architecture Frameworks
  • Zachman, ToGAF, DoDAF, MoDAF, SABSA
  • It shows how to integrate those components/controls into the various layers (Executives, Business Managers, System Architects, Engineers, Technicians, Enterprise) within an organization.
  • It is a blueprint to follow when building something with those parts.
3. System Architecture
  • COBIT (private organizations), NIST SP 800-53 (Federal), COSO Internal Control
  • Defines how we can develop those components/controls
4. Process Development
  • Defines how to manage those components/controls
  • Process Management tools (ITIL, Six Sigma, CMMI/Capability Maturity Model Integration)
5. Process Life Cycle
  • Discuss how to keep the process up-to-date and healthy
  • 4 steps process in cyclic order: Plan - Implement - Operate/Maintain - Evaluate

Let's see how these frameworks come in play. Suppose a company hires you to create a comprehensive security program. First you would do is look up ISO 27000 as a guidance to create an ISMS which provides all the controls you should put in place. Then, you choose a security framework such as ToGAF to create the ISMS and start the Process Life Cycle.
You go in the planning phase. You gather the right people, identify what needs to be done and identify the possible solutions.
Then, you go to the implementation phase. You create blueprints and implement them. You continuously make sure framework attributes (Strategic alignment, Business Enablement, Process Enhancement) are being monitored to ensure success. At this point, you have selected and implemented various controls. The categorization of controls into administrative, technical & physical along with the functional grouping (such as preventive, deterrent, detective etc) will have been a great help.
Ideally before going live, external party audits your implementation, more than likely the auditor will check your implementation against COBIT/NIST SP 800-53. They will find your shortcomings.Once you have addressed any audit shortcomings, you will enter the Maintain step.
At this point, you will want to manage the process using ITIL, Six Sigma or CMMI. This will help you in the Evaluate step, which then feeds back into Plan.


References:


Monday, December 12, 2016

GoogleSheets: Find the number of occurrences in the column

I love 'uniq -c' Linux command because it returns all the unique values along with their occurrences count.
I wanted do the same from Google Sheets. This is how I do it.

Let's say I have a list of fruits in Column A. There are repetitions and I would like to find the number of their occurrences.

Step1: Go to cell C1 and enter the formula '=UNIQUE(A:A)' . It returns all the unique items on column A.


Step2: Go to Cell D1 and enter the header 'Count'. Go to Cell D2 and enter a formula '=COUNTIF(A:A,C2)' .  It counts the number of occurrences of the unique items listed in Column C.


Isn't that easy? 

Tuesday, September 3, 2013

Kill long running MySQL queries automatically using PERL script

Note: Make sure that you have perl-DBD-mysql, perl-DBI and perl installed. If those package are missing, you can use YaST, YUM, ZYPPER, APT-GET to install those missing packages based on your distro.

Step1: Create a perl script that connects to the database and runs a query to show full processlist. Then, it goes through each row of the output from show full processlist and checks if a process is Query and it is running over 300 seconds(5 minutes). If so, kill that query.

/usr/local/bin # less killLongRunningSql.pl
use strict;
use DBI;
use DBD::mysql;

#MySQL connection
my $db_name = "YourDatabase";
my $db_connection = DBI->connect("DBI:mysql:$db_name","username","password") or die "Connection Error: $DBI::errstr\n";

#Execute query that shows the processlist
my $run_query = $db_connection->prepare("SHOW FULL PROCESSLIST");
$run_query->execute or die "SQL Error: $DBI::errstr\n";

#Declare @row array to store each row of above query being executed
my @row;

while (@row=$run_query->fetchrow_array()){
        if ( @row[5] > 300 && @row[4] =~ /Query/ ){
                my $killQuery = "KILL QUERY @row[0]";
                print "Query to be Executed: $killQuery\n";
                print "Process Info: @row[0] @row[1] @row[2]  @row[4] @row[5]\n";

                my $killQueryExecute = $dbh -> prepare($killQuery);
                $killQueryExecute-> execute;
        }
}

Step2: Add above script to cronjobs to run every minute

 # crontab -l
*/1 * * * * /usr/local/bin/killLongRunningSql.pl > /usr/local/bin/killLongRunningSql.log 2>&1


That's it!  Cheers!!!

Monday, August 12, 2013

Routing Protocols Basics : Must know

I like to classify routing protocols as following:

Class Algorithm Examples
Distance Vector(DV) Bellman-Ford Algorithm RIP, BGP
Link State Protocol(LSP) Dijkstra's Algoirthm OSPF, IS-IS
Advanced DV Bellman Ford + DUAL(Diffusing Update Algorithm) EIGRP

You can use multiple routing protocols in the same environment. Administrative Distance value is used for a selection of the best route when multiple routing protocols are in place. The lowest Administrative Distance value wins. For example: Static Routing is more trust worthy than EIGRP. EIGRP is more trust worthy than OSPF.

Main goal of Routing Protocol is a calculation of the optimum path. Fundamentally there are two base algorithms for the shortest path calculation:
  • Distance Vector (Bellman-Ford Algorithm)
    • Router sends a copy of routing table to it's neighbors
    • Periodic update
    • Slow convergence
    • Counting to infinity problem
      • Solutions to prevents count to infinity problem:
        • Define MAX count limit (e.g max 16 hop count in RIP; 15 hop count is the maximum diameter of RIP; Disadvantage: convergence is very slow i.e 15*30=450 seconds before routers know that network is not reachable)
        • Split Horizon: Don't advertise the route to the router from where it learned the route
        • Route Poisoning and Poisoning Reverse: If neighbor router goes down, router advertise that route is unreachable
[DV Analogy: When you are driving down to some place (say from Houston to Dallas), you look at the miles. If miles keep on going down, you know that you are heading in the right direction. ]
  • Links State Protocol (Dijkstra's Algorithm)
    • Router shares neighbors info with all the routers
    • No periodic update
    • Convergence is very fast (nearly 6 seconds)
    • Three different tables:
      • Adjacency Table
      • Topology Table
      • Forwarding Table
    • CPU and Memory intensive as changes in the network requires all the routers to update link state database, run the SPF algorithm, build the SPF tree and then rebuild the routing table.

Understanding Bellman-Ford Algorithm:

Understanding Dijkstra's Algorithm:
Really nice YouTube video:
http://www.youtube.com/watch?v=8Ls1RqHCOPw

Important notes to keep in mind:
  • Routing takes place at Layer 3(Network Layer). Packet Forwarding takes place at Layer 2(Data Layer).
  • MPLS (Multiprotocol Label Switching) is a mechanism that allows packet forwarding using labels, hence making it an independent of Protocol Type. It offers L3 VPN solution. MPLS is connection-oriented and packets are forwarded across pre-configured LSPs(Label Switched Paths).
[MPLS Analogy: Postal Service network uses ZIP code/ Postal Code as a label to forward your mail (could be anything like documents, TV, gifts, etc) to the recipient. After the mail reaches to the destination ZIP code/Postal code area, then actual address of the mail recipient is used to forward the mail. This process makes mail delivery much easier and efficient. MPLS works the same way.]
  • IGPs(RIP/OSPF/EIGRP) are used for routing within AS while EGP(BGP) is used for routing between different ASs. IGP is used to route within your own network and BGP is used when you are connecting to a network you don't control. 
[BGP/IGP Analogy: Considering US Interstate System: Interstates are BGP backbone and Interstates Exits are handoffs to IGPs ]
  • BGP relies on IGP for the routing table. If route is not in the table, BGP won't advertise it.
  • BGP (Border Gateway Protocol) is used to make core routing decisions on the Internet and decisions are made based on Path and Network Policies. BGP allows multihoming (connect to multiple ISPs) for better redundancy.
  • With MPLS in place inside providers network, BGP only need to be setup on PE(Provider Edge) routers.
  • VRF (Virtual Routing and Fowarding) allows multiple instances of a routing table to exist in a router and work simultaneously. VRF allows network path segmentation, thus increases network security. Thus, VRF is also referred as VPN routing and forwarding.
[ VRF Analogy: Running multiple VRFs on a router is just like running multiple Virtual Machines on a single hypervisor. Virtual Machines run independent of each other, likewise Routing Table of each VRFs are independent of each other. ].


>>>>>>Time to get your hand  dirty>>>>>>>

BGP Lab:


Scenario:
Customer edge router is connected to two different ISPs for redundancy.
IP Address and ASN info is shown in above topology.
Customer uses EIGRP for routing within it's own network. 
Customer uses BGP to connect to two different ISPs.

Step1: Configure IP addresses on the routers as show above

CPE-RTR-CORE#
interface Serial1/0
 ip address 169.153.1.2 255.255.255.0
 clockrate 64000
 no shut

CPE-RTR-EDGE#
interface Serial1/0
 ip address 169.153.1.1 255.255.255.0
 clockrate 64000
 no shut
interface FastEthernet0/0
 ip address 172.20.1.1 255.255.255.0
 no shut
interface FastEthernet0/1
 ip address 172.20.2.1 255.255.255.0
 no shut

ISP-1#
interface Loopback0
 ip address 2.2.2.2 255.255.255.0
 no shut
interface FastEthernet0/0
 ip address 172.20.1.2 255.255.255.0
 no shut

ISP-2#
interface Loopback0
 ip address 3.3.3.3 255.255.255.0
 no shut
interface FastEthernet0/0
 ip address 172.20.2.2 255.255.255.0
 no shut

Step2: Configure BGP

ISP-1#
router bgp 200
 network 2.2.2.0 mask 255.255.255.0
 neighbor 172.20.1.1 remote-as 100

ISP-2#
router bgp 300
 network 3.3.3.0 mask 255.255.255.0
 neighbor 172.20.2.1 remote-as 100

CPE-RTR-EDGE#
ip as-path access-list 10 permit ^$    
[Note: This allow only local routes being advertised to ISP. In other words, this filters internet routes from one ISP to go back to another ISP.]  

route-map localonly permit 10
 match as-path 10

router bgp 100
 network 169.153.1.0 mask 255.255.255.0
 neighbor 172.20.1.2 remote-as 200
 neighbor 172.20.1.2 route-map localonly out
 neighbor 172.20.2.2 remote-as 300
 neighbor 172.20.2.2 route-map localonly out

Detailed explaination on access-list and regex

Step3: Configure EIGRP 

CPE-RTR-CORE#
router eigrp 100
 network 169.153.1.0 0.0.0.255
 network 0.0.0.0 255.255.255.255  [This advertises all the routes known to this router]

CPE-RTR-EDGE#
router eigrp 100
 network 169.153.1.0 0.0.0.255
 network 0.0.0.0 255.255.255.255 [This advertises all the routes known to this router]


Some useful commands for troubleshooting:
#sh ip bgp
#sh ip bgp 
#sh ip bgp regexp ^$   [Display only local routes]
#sh ip bgp regexp ^100$  [Display routes learned from ASN 100 ]
#sh ip bgp regexp ^100_  [ Display routes with ASN 100 at front ]
#sh ip route
#clear bgp *   [Clear all BGP peers]
#debug bgp updates in
#debug bgp updates out


VRF Lab:


Scenario:
Say an ISP has two customers: Plano ISD (PISD) and Dallas ISD (DISD)
PISD and DISD both uses same subnet for IP addressing (172.20.0.0/24 & 172.20.1.0/24) and they can't change their addressing scheme.
As an ISP, you want to do business with both the customers. Your goal to isolate PISD network and DISD network ensuring network security. VRF is your solution.


Step1: Configure IP addresses on the routers as shown above

PISD1#
interface Loopback0
 ip address 1.1.1.1 255.255.255.0
interface FastEthernet0/0
 ip address 172.20.0.1 255.255.255.0

PISD2#
interface Loopback0
 ip address 2.2.2.2 255.255.255.0
interface FastEthernet0/0
 ip address 172.20.1.1 255.255.255.0

DISD1#
interface Loopback0
 ip address 1.1.1.1 255.255.255.0
interface Serial1/0
 ip address 172.20.0.1 255.255.255.0
 clockrate 64000

DISD2#
interface Loopback0
 ip address 2.2.2.2 255.255.255.0
interface Serial1/0
 ip address 172.20.1.1 255.255.255.0
 clockrate 64000

Note: You can't configure IP address on ISP router as it will throw an error that you are trying to configure duplicate IP address. In out network topology ISP s1/0 and f0/0 ports are going to have same IP address (i.e 172.20.0.2/24). ISP s1/1 and f0/1 are going to have same IP address (i.e 172.20.1.2/24).

Step2: Create VRF on ISP router and add interfaces to desired VRF so that you can configure IP address on ISP router to connect to CPE routers.

ISP#
ip vrf PISD
 rd 1:1
ip vrf DISD
 rd 2:2

Step3: Configure IP addresses on ISP router
ISP#
interface FastEthernet0/0
 ip vrf forwarding PISD
 ip address 172.20.0.2 255.255.255.0


interface FastEthernet0/1
 ip vrf forwarding PISD
 ip address 172.20.1.2 255.255.255.0

interface Serial1/0
 ip vrf forwarding DISD
 ip address 172.20.0.2 255.255.255.0
 clockrate 64000

interface Serial1/1
 ip vrf forwarding DISD
 ip address 172.20.1.2 255.255.255.0
 clockrate 64000

Step4: Configure OSPF on all the routers

CPE-ROUTERS(PISD1, PISD2, DISD1, DISD2)#
router ospf  1
 network 0.0.0.0 255.255.255.255 area 0 [This advertises all the routes known to this router]

ISP#
router ospf  1 vrf  PISD
 network 0.0.0.0 255.255.255.255 area 0 [This advertises all the routes known to this router]

router ospf  2 vrf  DISD
 network 0.0.0.0 255.255.255.255 area 0  [This advertises all the routes known to this router]

Some useful commands for troubleshooting:
#sh ip route
#sh ip route vrf  PISD
#sh ip router vrf DISD


Wednesday, June 12, 2013

Reset Windows / Windows Server / Domain Controller Administrator Password

Step1: Boot from Windows Bootable disk and select "Repair your Computer" Option


Step2: Follow  instructions until you get to following "Command Prompt" Option

Step3: Find which drive has Windows
Check if  C: drive has 'Windows' folder. If not, try D drive
>c:
         c:\>dir
        
        c:\> d:
        d:\> dir

Step4:  Replace Utilman.exe with cmd.exe. Note: Utilman.exe and cmd.exe are located under  Windows/System32
>cd Windows
Windows>cd System32
Windows\system32>move Utilman.exe  Utilman.exe.old
Windows\system32>copy  cmd.exe Utilman.exe
Windows\system32>exit

Step5:  Restart the server

Step6:  Once the booting is done, you are back to the logon screen. Click on the 'Ease of Access' icon

Hurray!!!.... There is your command prompt :)

Step7: Change the user password using command prompt.
>net   user   administrator   *
(Note: Windows doesn't allow easy passwords)

That's it. Now you can login as 'administrator' user

Let's say you want to add new user and add that user to the admin group
>net   user hacker   password123   /add
>net localgroup   administrators   hacker   /add

Don't forget to rename Utilman.exe.old to Utilman.exe.
Windows\system32>move Utilman.exe  Utilman.exe.old

Please use this instruction responsibly for the legitimate purpose.

Monday, May 6, 2013

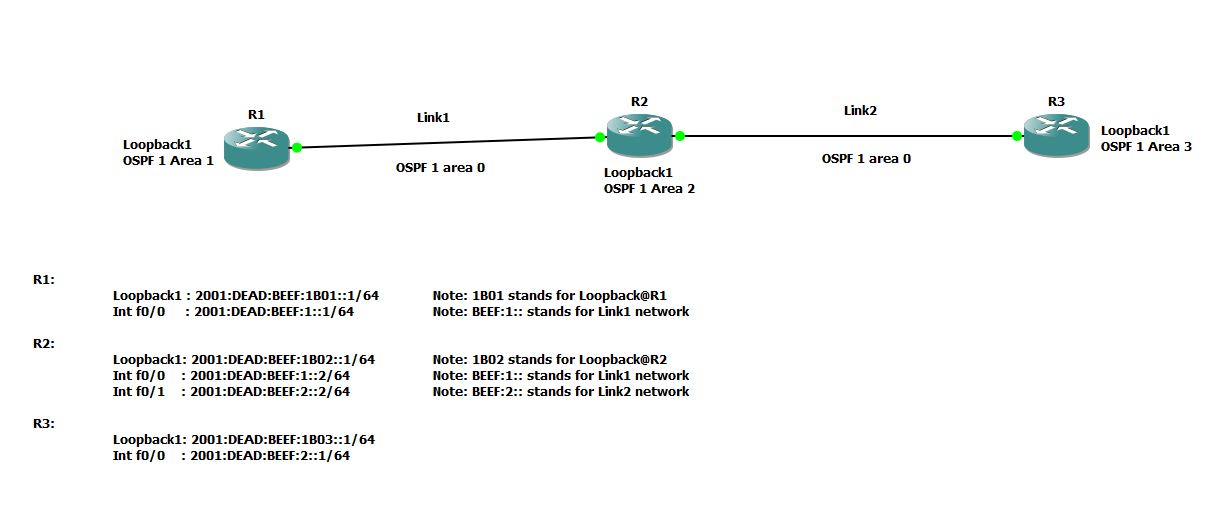
Setup OSPF Routing Protocol for IPv6 network


GNS3 has been used for this tutorial.
Assumption: You have basic knowledge of  CISCO and OSPF

  • IPv6 is 128 bits. Make life simple. Break it into two 64 bits. First 64 bits for network and second 64 bits for interface.You can break first 64 network bits into Global Unicast Prefix(48 bits) and Subnet(64 minus 48 = 16 bits).
  • OSPF is a link state dynamic routing protocol and it maintains a topology of the configured area. Area 0 acts as backbone area. Area 0 maintains the topology for the entire network. All Areas must have single interface attached to Area 0.
  • It is best practice to create Loopback 0 with IPv4 address that will be used by OSPF as Router-ID. For example: We used 192.168.1.1 for Router#1 and OSPF picks this address as Router-ID
R1(config)#interface loopback 0
R1(config-if)#ip address 192.168.1.1 255.255.255.0
R1(config-if)#no shut

  • Enable IPv6 unicast-routing and create OSPF router process. For example @ Router1
R1(config)#ipv6 unicast-routing
R1(config)#ipv6 router ospf 1
R1(config-rtr)#exit

  • For this tutorial, create Loopback 1 with IPv6 address and assign it to OSPF Area N (1 if it is Router1, 2 if it Router2). For example @ Router1
R1(config)#interface loopback 1
R1(config-if)# ipv6 address 2001:DEAD:BEEF:1B01::1/64
R1(config-if)# ipv6 ospf network point-to-point
R1(config-if)# ipv6 ospf 1 area 1

  • Configure IPv6 addresses on the interfaces interconnecting routers and assign that interface to OSPF Area 0 (Area 0 is the backbone area). For example @ Router1
R1(config)#interface f0/0
R1(config-if)#ipv6 address 2001:DEAD:BEEF:1::1/64
R1(config-if)#ipv6 ospf 1 area 0

  • Finally, check the IPv6 OSPF routing table and perform ping tests.
R1#sh ipv6 ospf neighbor
Neighbor ID     Pri   State           Dead Time   Interface ID    Interface
192.168.2.1       1   FULL/DR         00:00:38    4               FastEthernet0/0

R1#sh ipv6 route ospf
IPv6 Routing Table - 9 entries
Codes: C - Connected, L - Local, S - Static, R - RIP, B - BGP
       U - Per-user Static route
       I1 - ISIS L1, I2 - ISIS L2, IA - ISIS interarea, IS - ISIS summary
       O - OSPF intra, OI - OSPF inter, OE1 - OSPF ext 1, OE2 - OSPF ext 2
       ON1 - OSPF NSSA ext 1, ON2 - OSPF NSSA ext 2
O   2001:DEAD:BEEF:2::/64 [110/2]
     via FE80::C601:23FF:FE9C:0, FastEthernet0/0
OI  2001:DEAD:BEEF:1B02::/64 [110/2]
     via FE80::C601:23FF:FE9C:0, FastEthernet0/0
OI  2001:DEAD:BEEF:1B03::/64 [110/2]
     via FE80::C601:23FF:FE9C:0, FastEthernet0/0


Router configurations:
Router1#
!

ipv6 unicast-routing
!

!
interface Loopback0
 ip address 192.168.1.1 255.255.255.0
!
interface Loopback1
 no ip address
 ipv6 address 2001:DEAD:BEEF:1B01::1/64
 ipv6 ospf network point-to-point
 ipv6 ospf 1 area 1
!
interface FastEthernet0/0
 no ip address
 duplex auto
 speed auto
 ipv6 address 2001:DEAD:BEEF:1::1/64
 ipv6 ospf 1 area 0
!

!
ipv6 router ospf 1
 log-adjacency-changes
!

Router2#
!
ipv6 unicast-routing

!
interface Loopback0
 ip address 192.168.2.1 255.255.255.0
!
interface Loopback1
 no ip address
 ipv6 address 2001:DEAD:BEEF:1B02::1/64
 ipv6 ospf network point-to-point
 ipv6 ospf 1 area 2
!
interface FastEthernet0/0
 no ip address
 duplex auto
 speed auto
 ipv6 address 2001:DEAD:BEEF:1::2/64
 ipv6 ospf 1 area 0
!
interface FastEthernet0/1
 no ip address
 duplex auto
 speed auto
 ipv6 address 2001:DEAD:BEEF:2::2/64
 ipv6 ospf 1 area 0
!

!
ipv6 router ospf 1
 log-adjacency-changes
!
!


Router3#
!
ipv6 unicast-routing
!

!
interface Loopback0
 ip address 192.168.3.1 255.255.255.0
!
interface Loopback1
 no ip address
 ipv6 address 2001:DEAD:BEEF:1B03::1/64
 ipv6 ospf 1 area 3
!
interface FastEthernet0/0
 no ip address
 duplex auto
 speed auto
 ipv6 address 2001:DEAD:BEEF:2::1/64
 ipv6 ospf 1 area 0
!
!
ipv6 router ospf 1
 log-adjacency-changes
!
!


CISCO Bonus tips: 
How to setup SSH login in my Cisco router?
Ans: Following set of commands will create user 'admin' with password 'cisco'. RSA keys will be generated for encryption and authentication. Telnet will be disabled (Telnet is bad as there is no encryption involved) and SSH will be enabled.


conf t
 username admin privilege 15 secret cisco
 crypto key generate rsa general-keys label myrouterkey modulus 2048 

 ip ssh rsa keypair-name myrouterkey

 line vty 0 4
 login local
 transport input ssh


Wednesday, April 3, 2013

Setup secure firewall in Linux : iptables and netfilter

In Linux, components of netfilter and iptables are responsible for the filtering and manipulation of network packets.
The filtering criteria and actions are stored in chains, which must be matched one after another for each  network packets. The chains to match are stored in tables. The iptables command allows to alter these tables and rule sets. 
Check out the switches of iptables command 
#iptables -h 

Most frequently used switches are -t , -j, -A, -F, -p, -s, -d, -i and -o
-t table        table to manipulate (default: `filter')
-j target       target for rule (may load target extension)
-A chain            Append to chain
-F [chain]          Delete all rules in  chain or all chains
-p proto        protocol: by number or name, eg. `tcp'
-i  in-interface 
-o  out-interface

There are three different tables for Linux based firewall, each for a particular function:
  1. FILTER (Packet filtering; This table holds the filter rules that determine whether to ACCEPT or DROP packet)
  2. NAT (Masquerading; This table defines any changes to the source and target address of packets)
  3. MANGLE (The rules in this table allows IP header manipulation)
These tables contain several predefined chains to match packets:
  1. PREROUTING
  2. INPUT
  3. FORWARD
  4. OUTPUT
  5. POSTROUTING
Fig. iptables : Possible paths for a packet (Src: SLES Security book)


Let's start with some examples. Warning!!! Be very careful while executing iptables rules as you may lock yourself out of the server or disrupt network based services running on the server.

Basic Iptables operations: 
Note: Please follow the instructions step-by-step. Skipping steps is not advised.
  • Allow all kind of traffic(tcp/udp) from 192.168.1.0/24 subnet
  • Drop everything else
Rule1# iptables -A INPUT -s 192.168.1.0/255.255.255.0 -i eth0 -p all -j ACCEPT
(We are appending a rule to INPUT chain of FILTER table(default table). This rule checks if source address of the packet is in 192.168.1.0/24 subnet. If so, it will allow the traffic. Else, it will pass on to the next rule)

Rule2# iptables -A INPUT -s 0/0 -j DROP
(We are appending a rule to INPUT chain of FILTER table(default table). This rule drops everything else. Note: 0/0 means ANY )

Check the rules
         # iptables -vL --line-numbers
  • Now we want to INSERT a new rule after Rule#1. We want to allow UDP traffic from 10.0.0.0/8 subnet
NewRule# iptables -I INPUT 2 -s 10.0.0.0/255.0.0.0 -i  eth0 -p udp -j ACCEPT
(We are inserting a new rule as rule#2. This rules allows UDP traffic from 10.0.0.0/8 subnet)

Check the rules
         # iptables -vL --line-numbers

  • Now we want to REPLACE a new rule we just added earlier. We want to allow UDP traffic only from 10.11.0.0/16 subnet but not 10.0.0.0/8 subnet
ReplaceRule# iptables -R INPUT 2 -s 10.11.0.0/255.255.0.0 -i  eth0 -p udp -j ACCEPT
(We are replacing rule#2 with above rule. This rule allows UDP traffic from 10.11.0.0/16 subnet)

Check the rules
         # iptables -vL --line-numbers

  • Now we want to place this set of rules at system startup.
Let's say you validated all the rules and your system is working as desired. Now, you want to place this set of rules at system startup so that you don't have to type above commands manually again. 

#iptables-save > /etc/iptables.up.rules


#cd /etc/sysconfig/network/if-pre-up.d/
#vi iptables-load
#!/bin/sh
iptables-restore < /etc/iptables.up.rules
exit 0

#cd /etc/sysconfig/network/if-post-down.d/
#vi iptables-unload
#!/bin/sh
iptables-save -c > /etc/iptables.up.rules
if [ -f /etc/iptables.down.rules ]; then
   iptables-restore < /etc/iptables.down.rules
fi
exit 0
    #chmod +x iptables-load
    #chmod +x iptables-unload

Restart your server and check if rules are still there and your system is working as desired. 


Application1: Linux as NAT Router

Step1: Enable packet forwarding for IPv4
$ sudo vi /etc/sysctl.conf
# Uncomment the next line to enable packet forwarding for IPv4
net.ipv4.ip_forward=1


$ sudo sysctl -p /etc/sysctl.conf

Step2: MASQUERADE all the traffic leaving external interface (in our case eth1). MASQUERADE operation mask the private IP address of PC1 or PC2 with an external IP address of the Linux Router.
$ sudo /sbin/iptables -t nat -A POSTROUTING -o eth1 -j MASQUERADE

Step3: Forward all packets incoming from an internal interface (eth0) to external interface (eth1)
$ sudo /sbin/iptables -A FORWARD -i eth0 -o eth1 -j ACCEPT

Step4: Forward only RELATED and ESTABLISHED packets incoming from an external interface (eth1) to internal interface (eth0)
$ sudo  /sbin/iptables -A FORWARD -i eth1 -o eth0 -m state --state RELATED,ESTABLISHED -j ACCEPT

Step5: Check iptables
$ iptables -vL
OR
$ iptables -t filter -vL

To check NAT table
$ iptables -t nat -vL

[Note: if you don't specify table name using -t flag, default table 'filter' will be used ]

Step6: Try to get out to internet from PC1 or PC2. Say, browse www.google.com.

Bonus information:  Let's say you want to SSH  to PC2 (192.168.1.3 port 22) from an external network, you have to setup DNAT
Here, I am mapping port 11015 on an external IP address(Public Routable Address) of Linux Router to port 22 on PC2 which is in our internal network.


$   sudo iptables -t nat -A PREROUTING -p tcp --dport 11015 -j DNAT --to-destination 192.168.1.3:22
$  sudo iptables -A FORWARD -p tcp --dport 22 -d 192.168.1.3 -j ACCEPT
$  sudo iptables -t nat -A POSTROUTING -d 192.168.1.3 -p tcp --dport 22 -j MASQUERADE

Now, ssh  external_IP_address_of_LinuxRouter:11015 from an external network , you should get to 192.168.1.3:22.


Application2: Advanced Scenario (Firewall rules to mitigate an impact of DoS attack on Asterisk- VoIP Servers)

  • We want to delete all rules defined earlier and start fresh. We will be using 'hashlimit' match.
#iptables -F
  • Now, we want to define some advanced rules. We want to:
    • allow all packets from 192.168.1.0/24 subnet
    • limit the rate of SIP Invite from a host to mitigate DoS attack impact
    • limit the rate of SIP Registration from a host to mitigate DoS attack impact
    • allow all RTP(udp) traffic incoming from 10.0.0.0/8 subnet to ports 5000:31000(default RTP ports for asterisk)
    • drop any other packets
#iptables -A INPUT -s 192.168.1.0/255.255.255.0 -i eth0 -p all -j ACCEPT

#iptables -A INPUT -p udp -m udp --dport 5060 -m string --string "INVITE sip:" --algo bm -m hashlimit --hashlimit-upto 10/sec --hashlimit-burst 10 --hashlimit-mode srcip --hashlimit-name sip_i_limit -j ACCEPT

Look for the string "INVITE sip:" inside the UDP payload 
--hashlimit-upto   10/sec will allow upto 10 connection per second
--hashlimit-burst 10  will allow additional 10 packets before hit the limit (or how many fast connections you can have)
--hashlimit-htable-expire 10000   will expires hash entries in 10000 miliseconds

#iptables -A INPUT -p udp -m udp --dport 5060 -m string --string "REGISTER sip:" --algo bm -m hashlimit --hashlimit-upto 1/sec --hashlimit-burst 10 --hashlimit-mode srcip --hashlimit-name sip_r_limit -j ACCEPT

#iptables -A INPUT -s 10.0.0.0/8 -i eth2 -p udp -m udp --dport 5000:31000 -j ACCEPT
#iptables -A INPUT -s 0/0 -j DROP


  • We want to delete all rules defined earlier and start fresh. We will be using 'recent' match instead of 'hashlimit' match and achieve similar goal mentioned earlier to mitigate an impact of DoS attack.
#iptables -F

#iptables -A INPUT -s 192.168.1.0/255.255.255.0 -i eth0 -p all -j ACCEPT

#iptables -A INPUT 1 -i eth0 -p udp -m udp --dport 5060 -m string --string "REGISTER sip:" --algo bm --to 65535 -m recent --set --name VOIP --rsource

#iptables -A INPUT 1 -i eth0 -p udp -m udp --dport 5060 -m string --string "REGISTER sip:" --algo bm --to 65535 -m recent --update --seconds 60 --hitcount 12 --rttl --name VOIP --rsource -j DROP
Note: The maximum value for the hitcount parameter is given by the "ip_pkt_list_tot" parameter of the xt_recent kernel module. Exceeding this value on the command line will cause the rule to be rejected.

#iptables -A INPUT 1 -i eth0 -p udp -m udp --dport 5060 -m string --string "INVITE sip:" --algo bm --to 65535 -m recent --set --name VOIPINV --rsource

#iptables -A INPUT 1 -i eth0 -p udp -m udp --dport 5060 -m string --string "INVITE sip:" --algo bm --to 65535 -m recent --update --seconds 60 --hitcount 12 --rttl --name VOIPINV --rsource -j DROP

#iptables -A INPUT 1 -s 10.0.0.0/8 -i eth0 -p udp -m udp --dport 5000:31000 -j ACCEPT

#iptables -A INPUT -s 0/0 -j DROP

Go to iptables manual ( #man iptables ) to understand about hashlimit and recent match in detail.