
GNS3 has been used for this tutorial.
Assumption: You have basic knowledge of CISCO and OSPF
- OSPF is a link state dynamic routing protocol and it maintains a topology of the configured area. Area 0 acts as backbone area. Area 0 maintains the topology for the entire network. All Areas must have single interface attached to Area 0.
- It is best practice to create Loopback 0 with IPv4 address that will be used by OSPF as Router-ID. For example: We used 192.168.1.1 for Router#1 and OSPF picks this address as Router-ID
R1(config)#interface loopback 0
R1(config-if)#ip address 192.168.1.1 255.255.255.0
R1(config-if)#no shut
R1(config-if)#ip address 192.168.1.1 255.255.255.0
R1(config-if)#no shut
- Enable IPv6 unicast-routing and create OSPF router process. For example @ Router1
R1(config)#ipv6 unicast-routing
R1(config)#ipv6 router ospf 1
R1(config-rtr)#exit
R1(config)#ipv6 router ospf 1
R1(config-rtr)#exit
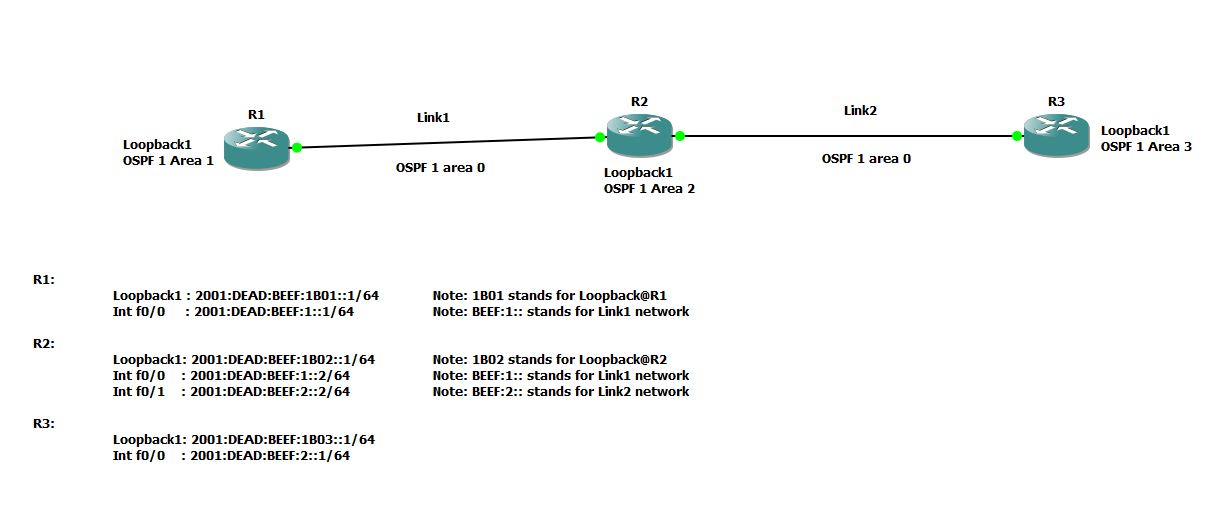
- For this tutorial, create Loopback 1 with IPv6 address and assign it to OSPF Area N (1 if it is Router1, 2 if it Router2). For example @ Router1
R1(config)#interface loopback 1
R1(config-if)# ipv6 address 2001:DEAD:BEEF:1B01::1/64
R1(config-if)# ipv6 ospf network point-to-point
R1(config-if)# ipv6 ospf 1 area 1
R1(config-if)# ipv6 address 2001:DEAD:BEEF:1B01::1/64
R1(config-if)# ipv6 ospf network point-to-point
R1(config-if)# ipv6 ospf 1 area 1
- Configure IPv6 addresses on the interfaces interconnecting routers and assign that interface to OSPF Area 0 (Area 0 is the backbone area). For example @ Router1
R1(config)#interface f0/0
R1(config-if)#ipv6 address 2001:DEAD:BEEF:1::1/64
R1(config-if)#ipv6 ospf 1 area 0
R1(config-if)#ipv6 address 2001:DEAD:BEEF:1::1/64
R1(config-if)#ipv6 ospf 1 area 0
- Finally, check the IPv6 OSPF routing table and perform ping tests.
R1#sh ipv6 ospf neighbor
Neighbor ID Pri State Dead Time Interface ID Interface
Neighbor ID Pri State Dead Time Interface ID Interface
192.168.2.1 1 FULL/DR 00:00:38 4 FastEthernet0/0
R1#sh ipv6 route ospf
IPv6 Routing Table - 9 entries
Codes: C - Connected, L - Local, S - Static, R - RIP, B - BGP
U - Per-user Static route
I1 - ISIS L1, I2 - ISIS L2, IA - ISIS interarea, IS - ISIS summary
O - OSPF intra, OI - OSPF inter, OE1 - OSPF ext 1, OE2 - OSPF ext 2
ON1 - OSPF NSSA ext 1, ON2 - OSPF NSSA ext 2
O 2001:DEAD:BEEF:2::/64 [110/2]
via FE80::C601:23FF:FE9C:0, FastEthernet0/0
OI 2001:DEAD:BEEF:1B02::/64 [110/2]
via FE80::C601:23FF:FE9C:0, FastEthernet0/0
OI 2001:DEAD:BEEF:1B03::/64 [110/2]
via FE80::C601:23FF:FE9C:0, FastEthernet0/0
Router configurations:
Router1#
!
ipv6 unicast-routing
!
!
interface Loopback0
ip address 192.168.1.1 255.255.255.0
!
interface Loopback1
no ip address
ipv6 address 2001:DEAD:BEEF:1B01::1/64
ipv6 ospf network point-to-point
ipv6 ospf 1 area 1
!
interface FastEthernet0/0
no ip address
duplex auto
speed auto
ipv6 address 2001:DEAD:BEEF:1::1/64
ipv6 ospf 1 area 0
!
!
ipv6 router ospf 1
log-adjacency-changes
!
Router2#
!
ipv6 unicast-routing
!
interface Loopback0
ip address 192.168.2.1 255.255.255.0
!
interface Loopback1
no ip address
ipv6 address 2001:DEAD:BEEF:1B02::1/64
ipv6 ospf network point-to-point
ipv6 ospf 1 area 2
!
interface FastEthernet0/0
no ip address
duplex auto
speed auto
ipv6 address 2001:DEAD:BEEF:1::2/64
ipv6 ospf 1 area 0
!
interface FastEthernet0/1
no ip address
duplex auto
speed auto
ipv6 address 2001:DEAD:BEEF:2::2/64
ipv6 ospf 1 area 0
!
!
ipv6 router ospf 1
log-adjacency-changes
!
!
Router3#
!
ipv6 unicast-routing
!
!
interface Loopback0
ip address 192.168.3.1 255.255.255.0
!
interface Loopback1
no ip address
ipv6 address 2001:DEAD:BEEF:1B03::1/64
ipv6 ospf 1 area 3
!
interface FastEthernet0/0
no ip address
duplex auto
speed auto
ipv6 address 2001:DEAD:BEEF:2::1/64
ipv6 ospf 1 area 0
!
!
ipv6 router ospf 1
log-adjacency-changes
!
!
CISCO Bonus tips:
How to setup SSH login in my Cisco router?
Ans: Following set of commands will create user 'admin' with password 'cisco'. RSA keys will be generated for encryption and authentication. Telnet will be disabled (Telnet is bad as there is no encryption involved) and SSH will be enabled.
conf t
username admin privilege 15 secret cisco
crypto key generate rsa general-keys label myrouterkey modulus 2048
ip ssh rsa keypair-name myrouterkey
line vty 0 4
login local
transport input ssh
No comments:
Post a Comment