1. Create Repository on the CVSNT server.
2. Launch wincvs and navigate to Admin --> Preferences --> specify CVS HOME [it is any directory that might be needed for wincvs configuration, however you will not need it if you are beginner]. If you have installed WinMerge or File Compare Tool (powerful), you can select that as your External Diff program. If you have Notepad++ installed, you can select that as your default editor.
3. Import module into the Repository (it means importing the Local project directory into the Repository)
a> Before importing module, we need to browse the local directory from wincvs [ see the browse section at the top in toolbar section]
b> On left side, you will see your local project directory which you just browsed.
c> Right click the folder and select Import Module option
d> Ignore the files which you can't edit [ e.g. .rpm, .bak, .pub and many more]
e> Specify the CVSROOT and repository location
f> You might want to tell wincvs to create CVS hierarchy so that it can create versions of files.
4. You can start editing files [Remember: When you are editing files, you are editing in your local project folder, no in the repository]. Once you are done, you can commit the changes. Commiting the changes means to make the change on the Repository too. Once the change is done on repository, you can checkout the module [ your project ]. Checkout means pulling out the project from the repository.
[local project directory] ------import--> [Repository] -----export--> [checkout project directory]

Wednesday, April 14, 2010

Sunday, March 28, 2010
Change UUID of virtual drive
I made a copy of virtual drive (by copy and pasting .vdi file). Then, I tried to mount the .vdi file in the virtual machine. It came up with some error: A hard disk with UUID {bla..bla..bla......} is already registered. So, I was unable to mount the drive.
Now, what is the solution?
Ans: Change the UUID of the virtual/image drive.
How can I change the UUID of the virutal drive?
Ans: You have to run the VBoxManage command
[Before running command, make sure that environment variable is set to the location of the virtual box commands. To set environment variable: Go to "My Computer" --> Right click --> Properties --> Advanced --> Environment Variables --> Add the location of Virtual Box to the PATH variable; In my case it is : PATH .......;C:\Program Files\Sun\VirtualBox ]
C:\ > VBoxManage internalcommands setvdiuuid disk2.vdi
[disk2.vdi is the name of my copied .vdi file]
Now, try to mount the disk2.vdi in Virtual Machine.
Have a good one!
On my second day, I found issue with SLES (Suse Linux). It keeps on complaining "VB is waiting for /dev/disks/by-id/scsi-xxxxx-part2 to appear".
After some research on blogs, found that GRUB in SLES looks for UUID of disk to boot.
I set the copied/cloned harddisk as second harddisk (primary slave) for the original SLES VM. Then I startet the original SLES VM.
In the running SLES VM I made a new directory and mounted it to the root directory of the cloned harddisk.
Then I startet (as root) the Yast partition manager and noticed the UUID of the cloned harddisk. (It is made from the UUID shown with vboxmanage list hdds, but it is not the same).
Then I edited (as root) the /boot/grub/menu.lst and the /etc/fstab : I changed the UUID everywhere the old one was (do not use capital letters instead of small letters).
Now shutdown (after unmounting the cloned root directory)
Then I disabled the cloned harddisk as second harddisk in the original VM and set it as first harddisk in the cloned VM.
Starting the cloned VM now works.
For Network cards to work you have to do
Now, what is the solution?
Ans: Change the UUID of the virtual/image drive.
How can I change the UUID of the virutal drive?
Ans: You have to run the VBoxManage command
[Before running command, make sure that environment variable is set to the location of the virtual box commands. To set environment variable: Go to "My Computer" --> Right click --> Properties --> Advanced --> Environment Variables --> Add the location of Virtual Box to the PATH variable; In my case it is : PATH .......;C:\Program Files\Sun\VirtualBox ]
C:\ > VBoxManage internalcommands setvdiuuid disk2.vdi
[disk2.vdi is the name of my copied .vdi file]
Now, try to mount the disk2.vdi in Virtual Machine.
Have a good one!
On my second day, I found issue with SLES (Suse Linux). It keeps on complaining "VB is waiting for /dev/disks/by-id/scsi-xxxxx-part2 to appear".
After some research on blogs, found that GRUB in SLES looks for UUID of disk to boot.
I set the copied/cloned harddisk as second harddisk (primary slave) for the original SLES VM. Then I startet the original SLES VM.
In the running SLES VM I made a new directory and mounted it to the root directory of the cloned harddisk.
Then I startet (as root) the Yast partition manager and noticed the UUID of the cloned harddisk. (It is made from the UUID shown with vboxmanage list hdds, but it is not the same).
Then I edited (as root) the /boot/grub/menu.lst and the /etc/fstab : I changed the UUID everywhere the old one was (do not use capital letters instead of small letters).
Now shutdown (after unmounting the cloned root directory)
Then I disabled the cloned harddisk as second harddisk in the original VM and set it as first harddisk in the cloned VM.
Starting the cloned VM now works.
For Network cards to work you have to do
- rename the ifcfg-eth-id-
to ifcfg-eth0 (in /etc/sysconfig/network) - remove the rules file (/etc/udev/rules.d/30-
- edit /etc/sysconfig/network/config and change FORCE_PERSISTENT_NAMES to "no".
Saturday, March 27, 2010
Install VMware-tools
It might be challenging to install VMware-tools if we don't know what exactly we are doing.
You need to read all the instructions that is provided by VMware workstation or Virtual Center or ESX server.
For now, I am going to give the instruction for Linux systems.
After installing Linux as Virtual Machine on the top of VMware workstation/ESX Server or VSphere (whatever), you will see that VMware-tools is not installed.
Steps to be followed:
1) Choose "Install VMware tools" from VM menu
2) You will recognize some change on "cd-rom" icon located at Left corner of VM. It just like someone has inserted the CD of VMware tools in your VM.
3) Now you need to mount the CD-ROM so that you can access the contents.
#mount /dev/cdrom /mnt/cdrom
If you are lucky, above command will work without any issue. If not you might have to specify some mount options like
# mount -o ro /dev/cdrom /mnt/cdrom
(which mean mount as read-only option)
Some systems requires you to specify the file-systems type. FYI, CD-ROM uses iso9660 file-system
# mount -t iso9660 -o ro /dev/cdrom /mnt/cdrom
4)After this, go to /mnt/cdrom directory. You will find VMware-toools over there. You can install from RPM or TAR file. It all depends on you, however I recommend tar file.
# cd /mnt/cdrom
# rpm -ivh [VMware-tools......rpm]
or
# cd /mnt/cdrom
#tar -xvzf [VMware-tools.......tar] /root/vmware
(this will un-archive the "tar" file under /root/vmware directory
# cd /root/vmware
#./vmware-install.pl
You need to read all the instructions that is provided by VMware workstation or Virtual Center or ESX server.
For now, I am going to give the instruction for Linux systems.
After installing Linux as Virtual Machine on the top of VMware workstation/ESX Server or VSphere (whatever), you will see that VMware-tools is not installed.
Steps to be followed:
1) Choose "Install VMware tools" from VM menu
2) You will recognize some change on "cd-rom" icon located at Left corner of VM. It just like someone has inserted the CD of VMware tools in your VM.
3) Now you need to mount the CD-ROM so that you can access the contents.
#mount /dev/cdrom /mnt/cdrom
If you are lucky, above command will work without any issue. If not you might have to specify some mount options like
# mount -o ro /dev/cdrom /mnt/cdrom
(which mean mount as read-only option)
Some systems requires you to specify the file-systems type. FYI, CD-ROM uses iso9660 file-system
# mount -t iso9660 -o ro /dev/cdrom /mnt/cdrom
4)After this, go to /mnt/cdrom directory. You will find VMware-toools over there. You can install from RPM or TAR file. It all depends on you, however I recommend tar file.
# cd /mnt/cdrom
# rpm -ivh [VMware-tools......rpm]
or
# cd /mnt/cdrom
#tar -xvzf [VMware-tools.......tar] /root/vmware
(this will un-archive the "tar" file under /root/vmware directory
# cd /root/vmware
#./vmware-install.pl
Tuesday, March 9, 2010
Some slick Unix/Linux commands... much more powerful and useful
KILL
usage:
Kill process by Process ID
usage:
Kill process by Process ID
- kill -9 [PID] --> Forcefully Kill
- kill -15 [PID] --> Gracefully Kill
- kill %[JobID] --> JobID can be checked by command #jobs
Kill process by Process Name
- killall [proces name]
PID/Process name can be found using commands like
- ps -aux
- ps -elf
- netstat -anp
- lsof -w -n -i [tcp/udp:port number]
System Tuning Commands:
#mpstat -A ALL --> CPUs status
#top --> Press 'I' to toggle between Irix Mode (Irix Mode display resource usage mulitplied by total number of CPUs) ; Press "1" to see all the CPUs
# sar
Networking Commands
#netstat -anp --> Where 'p' flag shows which program is making connection
[ Hey, now I know which program is making a connection, can I use kill command to kill by process name or PID? Answer: Ofcourse, that's the reason I am writing this article ]
Now you know how to terminate the particular remote connection in the server. There is also another technique using #lsof.
# lsof -w -n -i tcp:22
This command will display all the SSH (tcp:22) connections. So, you can see who has intruded in your system using SSH. This will also give process ID (PID) or process name, which you can terminate using KILL command.
[ use man page for each command in details]
#ifstat
#ethtool [ethernet interface name] --> this command can used to see if the interface is physically down or not
e.g # ethtool eth1
#netstat -i
#netstat -s
To get the BIOS information
#dmidecode
To list the hardware
#hwinfo
or
#lshw
[Note: lshw is not the linux project. If you want to use lshw, you have to download and install the RPM for that command http://ezix.org/project/wiki/HardwareLiSter ]
Bash Script to collect system information:
This is one of the simple script file to pull basic and informative information about your server:
#********************
#ServerReport.sh
# Created by DShah
# Please use it at your own risk
#********************
#!/bin/bash
miniDivider(){
echo "*******************************************************************";
}
serverInfo() {
uname -a
cat /etc/*release
}
diskInfo() {
# fdisk -l
df -h
iostat
}
memoryInfo() {
free -m
vmstat
}
cpuInfo() {
mpstat
mpstat -P ALL
}
overallInfo() {
top -b -n2
}
networkInfo() {
netstat -s
miniDivider
sleep 2
netstat -s
}
dividerLine(){
echo "########################################################################";
echo "########################################################################";
}
fileName="serverReporting.txt"
rm $fileName
touch $fileName
echo "ServerInfo Reporting"
serverInfo >> $fileName
dividerLine >> $fileName
echo "DiskInfo Reporting"
diskInfo >> $fileName
dividerLine >> $fileName
echo "MemoryInfo Reporting"
memoryInfo >> $fileName
dividerLine >> $fileName
echo "CPUInfo Reporting"
cpuInfo >> $fileName
dividerLine >> $fileName
echo "Network Info Reporting"
networkInfo >> $fileName
dividerLine >> $fileName
echo "Top command reporting";
overallInfo >> $fileName
Sunday, December 27, 2009
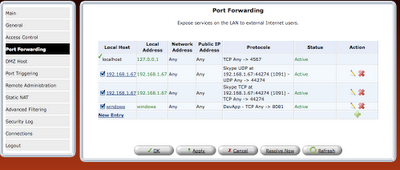
Port Forwarding Rule Setup in Actiontec router (VZ WIRELESS ROUTER)
First of all login in router access page; most often it is http://92.168.1.1
In my case
public IP: 72.B.C.D (I haven't provied my public ip for my privacy)
private IP: 192.168.1.x
Step: 1 Click on Firewall Setting--> Port Forwarding --> New Entry
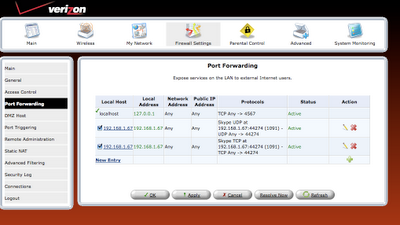
step: 2 Give the device name (LAN device) where your outer world need to have access; for e.g Web server in LAN hosted on computer named as 'windows' with IP add 192.168.1.16
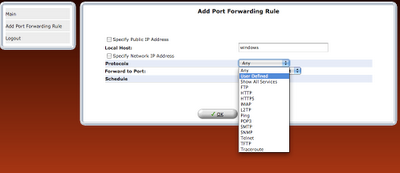
step 3: We selected "Forward to Port : User Defined " so that we can customize the way (I mean the Port) we can access LAN service from outside world. I named my WebServer application as DevApp.
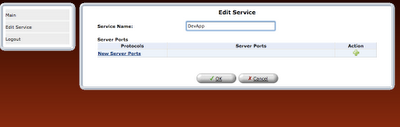
step 4: Now configure the service/Application. The simplest rule would be: Any one can access through the my defined Port (say 8081) using TCP protocol
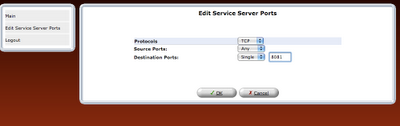
step 5: now we should select OK
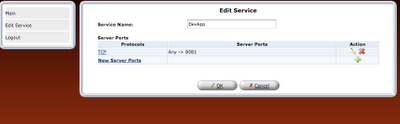
step 6: Forward to Port : the port where my web server is listening. In my case my web server is listening at 192.168.1.16:8081 (FYI - Listen port can be changed in httpd.conf e.g Listen 192.168.1.16:8081)
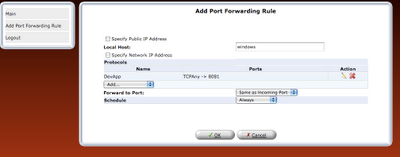
step 7:
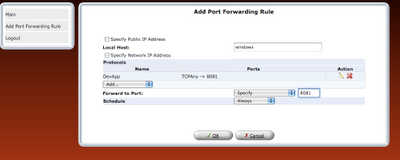

 step 8: Once the rule is defined, it should be refreshed in router or applied.
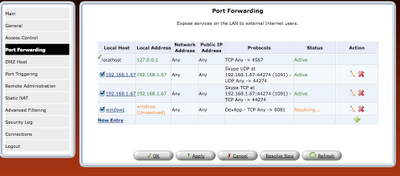
step 9: Click Refresh/Apply
In my case
public IP: 72.B.C.D (I haven't provied my public ip for my privacy)
private IP: 192.168.1.x
Step: 1 Click on Firewall Setting--> Port Forwarding --> New Entry

step: 2 Give the device name (LAN device) where your outer world need to have access; for e.g Web server in LAN hosted on computer named as 'windows' with IP add 192.168.1.16

step 3: We selected "Forward to Port : User Defined " so that we can customize the way (I mean the Port) we can access LAN service from outside world. I named my WebServer application as DevApp.

step 4: Now configure the service/Application. The simplest rule would be: Any one can access through the my defined Port (say 8081) using TCP protocol

step 5: now we should select OK

step 6: Forward to Port : the port where my web server is listening. In my case my web server is listening at 192.168.1.16:8081 (FYI - Listen port can be changed in httpd.conf e.g Listen 192.168.1.16:8081)

step 7:
 step 8: Once the rule is defined, it should be refreshed in router or applied.
step 9: Click Refresh/Apply

Sunday, October 11, 2009
My Guest OS cannot ping My Host OS in Virtual Box
The default networking setup for VirtualBox is NAT, which means basically that your host computer is acting like a router, creating a virtual network for your virtual machine to connect to. Naturally, this network has it's own IP scheme.
I have a router(gateway) 192.168.1.1 (255.255.255.0)
host computer 192.168.1.5
I was trying to manually set up my guest to static ip 192.168.1.12 and found it cannot ping my gateway, neither can access internet.
By default the ip of guest is 10.0.2.15, it can access internet and my router(192.168.1.1)
To fix the issue, I had to use Bridge Network.
1) Virtual Box -> SETTINGS -> NETWORK -> Bridge -> Edit Setting -> Add your active adapter for internet/network (in my case I am using Wireless Adapter en1: AirPort of my MacBook )
2) Then I started my guest OS. Say I have Windows XP as my guest OS. I need to edit the network settings. Manually add the IP ADD, DEFAULT GATEWAY, DNS. Since my router act as DNS for my LAN, I used DNS same as my DEFAULT GATEWAY.
I have a router(gateway) 192.168.1.1 (255.255.255.0)
host computer 192.168.1.5
I was trying to manually set up my guest to static ip 192.168.1.12 and found it cannot ping my gateway, neither can access internet.
By default the ip of guest is 10.0.2.15, it can access internet and my router(192.168.1.1)
To fix the issue, I had to use Bridge Network.
1) Virtual Box -> SETTINGS -> NETWORK -> Bridge -> Edit Setting -> Add your active adapter for internet/network (in my case I am using Wireless Adapter en1: AirPort of my MacBook )
2) Then I started my guest OS. Say I have Windows XP as my guest OS. I need to edit the network settings. Manually add the IP ADD, DEFAULT GATEWAY, DNS. Since my router act as DNS for my LAN, I used DNS same as my DEFAULT GATEWAY.
Subscribe to:
Posts (Atom)